It’s a sad fact that period properties which remain in the hands of loving homeowners rarely suffer as much damage as those which uncaring landlords got their grubby hands on. Splitting rooms, adding hallways and *modernising* can all result in the loss of period features and I must confess that 20yrs ago I was on occasion guilty of this and still beat myself up about it. When first starting up the Property Ladder (literally) I had an on-screen debate with Sarah Beeny about taking out a fireplace from a Victorian terrace bedroom. I think my words might have been along the lines of “What they don’t know won’t hurt them”. Eek! Though I kept the fireplace and re-sited it elsewhere and though the room was ‘better’ with the bed moved, Sarah was right in the sense that respect for period features can only be a good thing. We might not want to preserve our homes in aspic, but how many people regret the wanton ripping out of irreplaceable cornices, decorative timbers and beautiful original features? The answer, of course, is lots, because fashions and fads come and go but heritage can’t be replicated and superb quality finishes are costly to reproduce.
I resolved many years ago to change my ways and be more respectful. When I bought the very run down Moregeous Mansions 15yrs ago, considering she’s sitting in an area where the beautiful housing stock has been mostly battered by greedy student landlords, I struck gold as she was (mostly) intact and hadn’t been carved up.
That said, even before we’d even started the renovation we could see many of the skirting boards were split or damaged, some were mismatched and some had just been plain old cobbled together right from the Edwardian outset. We were going to be moving doors, changing layouts, extending the house and removing 80% of the skirting boards to allow underfloor heating to be fitted on top of the joists. Many MANY more architraves and skirts were going to be needed. 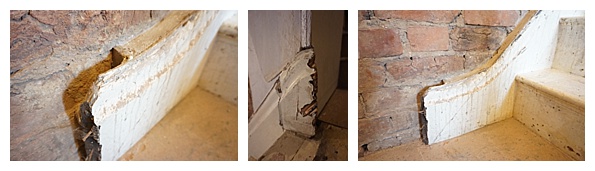 It’s an excellent move, in the very early days of any renovation, to make sure that you safely label and pack away a section of both the original removed skirting boards and architraves whilst all the messy building work is done. During the chaos of a renovation, things often get lost and thrown away, even precious things! My tip is to get a large plastic sealable box marked “Do Not Touch” to keep important items like this safe, and keep it in a room the builders aren’t allowed to enter.
If you have the space like a garage or dry cellar, carefully remove original lengths skirtings and architraves, de-nail them, write in marker pen on the back where they were removed from and store them. They can be stripped of paint later and re-used if you are super serious about restoration. New modern pine skirtings, mostly made from fast grown young wood, aren’t a patch on the old timber ones which lie flat and unwarped especially if they are over 5″ high. In larger houses, buying extra height skirtings can be very costly and new wood just isn’t the same as old, it warps and cups terribly.
However you may either still needs more, or for whatever reason may have lost many original timber features. Some of you home renovators might not know that instead of simply buying standard torus or pencil round skirtings/arcs from local timber merchants or DIY sheds, specialist timber moulding companies can help restore your home to it’s much more specific former woodwork glory. They not only hold stocks of heritage moulds for more unusual timber work but can also make bespoke moulds if you need them too. This comes at a price of course but if you’re determined to match existing woodwork, there’s no better way.
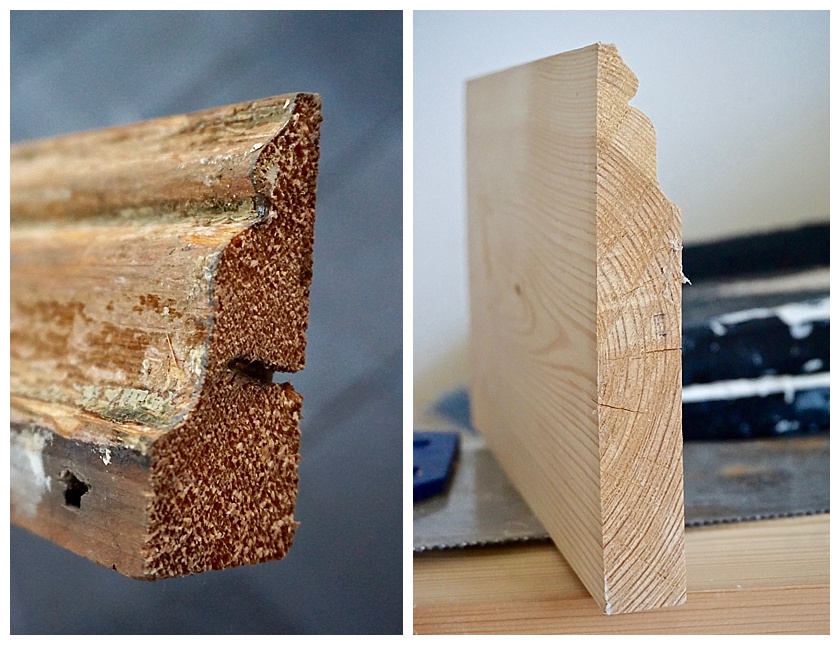
 The image above is a piece of our original door surround architrave. Pretty isn’t she? There were only three intact and despite all the destruction, we’ve managed to keep in place two sets of the original arcs: one to the office and one to the guest bedroom.
 This image above was the top of the original skirting for the main living room and front reception, soon to be the home office. These skirtings were, I kid you not, a foot high. Massive! They were made in two pieces, with the lower high section fixed onto wooden battens screwed into the walls, and then this upper, decorative section pictured above, sat on top. Sadly these original skirtings had to come off to allow us to future proof the house with underfloor heating, and some were damaged as the tall sections were actually quite flimsy.
Now, you can either go online and buy from specialist companies or find a local mouldings company. I asked my local timber supplier and found Lancashire based specialists Dresser Mouldings, contacting them to see if they could help. You could also find your local firm by searching ‘timber mouldings’ in your town or city.
I put the cleaned sharp ends of my saved timber onto paper and drew round them, marking the measurements. This way the company can check their archives to see if they have a similar skirting already made as stock, or a mould done in the past to produce from. This is therefore cheaper for you as you don’t have to have a new mould made to your specification. I scanned the drawing into my Mac and emailed it off….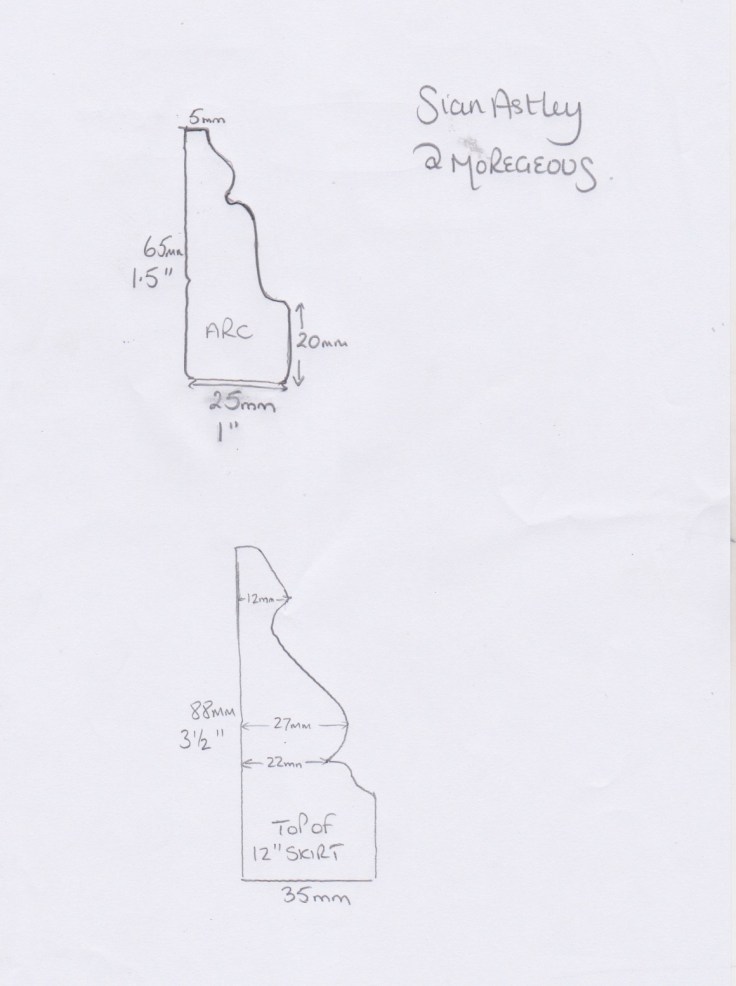 Guess what? Nothing exactly the same. I blinkin’ knew it! These below were the closest but unfortunately not close enough for me.
 The only option was for Dressers to actually make new skirtings and architraves to my exact drawings copied from the original timbers.
We hit a bit of an issue here and this is a good tip for you. If you notice on the Dressers drawings, all their example sections are at 21mm in depth, which is apparently fairly standard in the industry now for pine skirtings. Any deeper and you pay extra as they buy in planks at 21mm and all their machines are set to that. Now look at my drawing with the original timber sections at 25mm and 35mm. They simply couldn’t buy in lengths of pine especially for me at 25mm and 35mm thick, to then machine then into the exact decorative mould of my original pieces, at a price which was anywhere near affordable.
We couldn’t simply go thinner to 21mm and keep the exact curves either as those curves are designed into deeper sections of timber, so they had to be amended slightly.
The deepest curve was on my 35mm skirting section, as opposed to my 25mm architrave section. This was impossible to replicate on a 21mm pine board. If I chose to have that made throughout the house, on all 5″, 7″ and 9″ lengths, I’d have been bankrupt. Sorry, make that more bankrupt. Renovation woes 😉
We decided to use the ‘pattern’ from our original 25mm architrave and slim the curve down ever so slightly to help it to fit a 21mm pine board. This is how it turned out.  You can see the complete difference in the type of pine: the old one the left: a dense wood, thick and rich in colour (and smell, believe me), compared to the new pine on the right: fast grown, light in texture and colour and prone to warping as it’s so full of moisture and so young (green, they call it).
However, in terms of replicating the original curves and style – brilliant!
And the price? The 5″ architrave and 7″ skirting were both around £3 per m, the 9″ just over £5 per m.
For me, the slightly higher cost when compared to buying slightly more decorative Ogee or Lady’s slipper style lengths direct from a local timber yard was acceptable. In the whole scheme of things, skirting board and architraves certainly aren’t the most expensive materials on a renovation yet are so very visible and make such a statement as to your style and design aesthetic. This extra effort we’ve gone to reflects the heritage of our house and her past, and gives our renovation an authenticity we would have lost. It’s not a restoration as such, with all the costs that entails, but it’s pretty damn close.
Also, if you compare that price to some of the online prices for ‘period’ skirting, it’s actually way more affordable!
We’re fitting all the woodwork ourselves so it’s a slow room by room process, but some are now on and I just love them.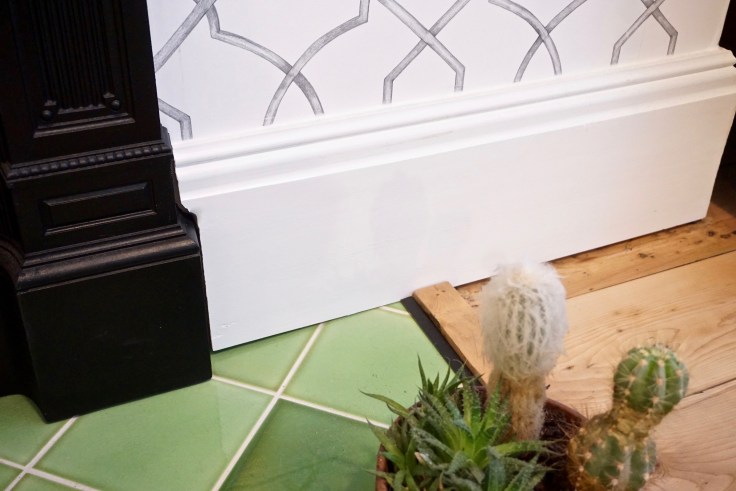
 And yes, eager eyed readers, I know the above arc is ‘reversed’ but this is how the original arc still to this room is fitted and the new ensuite door way needs to match!
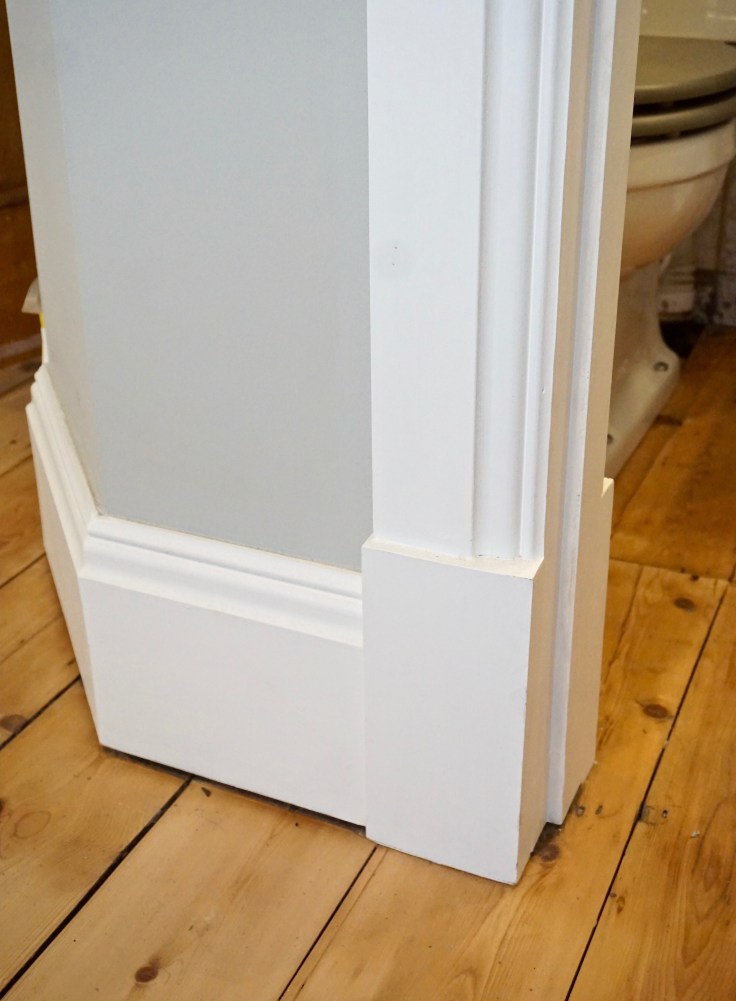
The new skirts work with the original stripped pine floor above but also with the more contemporary LVT Amtico herringbone floor in the attic bedroom. Though we haven’t quite finished fitting the woodwork, this shot shows you the profile nicely. Plus you can see how modern pine can warp slightly – I’ve had to caulk the top of this one with my magic Moregeous caulking finger. This was a really interesting process for us to go through, and I couldn’t really find an advice or blog posts on this subject when I searched. I hope this helps some of you renovators to recreate some original woodwork designs, it’s such a shame to lose them forever isn’t it?
Good luck and let me know how you get on!

Thank you for sharing this info! We just started work on our Edwardian renovation which the previous owners lived in for 70+ years and didn’t really do much to it, so we have lots of original features – wish I’d taken samples of some of the wallpapers to frame later! One builder suggested we replace the original skirting with MDF versions – to save time in sanding and re-painting it. No thank you! I love our slightly disheveled original skirtings. We do need to replace a small part of it where they had to replace it for some reason – I will be checking out your source to see if they have any of the same in stock. Thanks again for such a timely post!
You are so welcome Wendy and I’m delighted it was useful to you. Send me a picture on sian@moregeous.com, I’d love to feature your story if it works out 🙂
Contact Dresser Mouldings but also each moulding company do have different ones so it’s always worth the extra effort. It’s great that you care so much – thumbs up to you! x
Nice post! I use Dresser Mouldings a lot for interesting profiles, although I also like to make my own mouldings because I’m unwilling to spend as much as you are, and my house had virtually none of the original stuff anyway.
https://burnleyhouse.wordpress.com/2017/01/23/how-to-make-your-own-mouldings/
I have searched high and low for the replacement architrave for my georgian window exterior surround. The closest match I can find was your picture and drawing (arc). Mine is identical to arc but it is 50mm wide and 25 mm depth. Is arc the style name, I have searched all the manufacturers websites but find nothing the same. The windows are only 30 years old. To be honest I am only looking to replace a rotten section (1 foot long) but i really wanted to replace like for like rather than the whole window as the window is part of a set of 4. Different architrave on one would look out of place. Any suggestions?
Hi Roger, very delayed reply – let’s blame Covid 😉 Did you get these sorted? A good joinery company would be able to template them for you x
It’s a shame I didnt know about you lot before hand. I specialise in listed buildings, copying the old patterns and machining to spec, absolute skirtings and mouldings. Co.uk
Some of the pictures are stunning. It is a real shame people leave places like this to rot, or rip out and put standard torus or chamfer in. Makes me boil sometimes. Really pleased to have read someone who takes pride and passion in restoring to a grand era,