
I listened to the chiding voice and broke my blog-silence this week, yippee, and whilst we’re not talking floodgates or daily posts or anything ridic like that, there are a few things I’ve been up to which might be of interest to you home renovators and property lovers who pop by the Moregeous blog. Who pop by and have found it a tad lacking recently, for which I apologise.
We’ve been getting stuck into some tiling and it’s all about shape, pattern and transition, with walls melting into floors and tiles morphing into other materials. Getting the tilers in isn’t cheap though so when you do it, it’s a good idea to get it right. Obviously there are the usual things to decide on….
- Work out exactly how many tiles you’ll need, allowing for cuts and edges, in square metres. Most tiles are sold by the (approx) metre box but do check with the supplier. Remember it can be costly for you if the tiler runs out then have to pay for them to come back to finish when you’ve got more!
- Grout line width – all down to personal taste but consider the size of the spacers as compared to the size of the tile. Don’t specify too thin a grout line with unrectified tiles, it’ll just crack out.
- Grout colour colour – the accepted wisdom has been to match grout for subtlety though contrasting colours like charcoal with white tiles are now increasingly popular.
- Tile directions – simple block on block and brick bond choices are being speedily overtaken by herringbones, chevrons and linear styles.
However, there’s something else on which I feel a driving need to give a bit of advice. Heavily patterned tiles have been making a massive comeback and the ones with set lays as below are pretty straightforward for your fitter to complete. There’s no Einstein-like thought required as to which tile sits next to which. Easy peasy. Slightly more complex are the mixed box patterns used to create something similar to the floor and splashback below. Most decent tilers can manage to create these expanses without the schoolboy error of placing the same patterned tiles next to each other. Even so, it’s good to keep an eye on their laying process and scan an eye over it before the adhesive dries, in case of mistakes.


Don’t let anyone tell you tiles can’t be lifted and moved before the adhesive ‘goes off’. It can, but that’s not carte blanche to get a tiler to do a wholesale switch around. Unless you want him to go for lunch and not come back. Below is a pattern which looks fabulous, but the three tiles above the taps would irritate me, three of the same pattern in a line, even though they’re different colours. That’s what I mean by watching out.
 So far so good, but now it gets complex. With the increasing desire for individuality in interiors, there are some rockstar spectacular tiles coming onto the market. Ceramic or porcelain in different hues and surface reliefs mean designers and home renovators can quite literally have something no-one else has, and you know what that means right? TILE GOALZ!
Just look at these three amazing walls below. Wowsers. Would you put money on the fact that all had (££) architectural practice design input? I think I might. So if you’ve no Norman Foster on site to guide you through, how do you DIY and achieve cracking results?
Planning. Planning, planning, planning, planning and, um, planning. Get great advice from a good tile supplier and they know their ranges, know what’s coming in from (often) Spain and Italy and know how all their tiles ‘play’ together. Do lots of online research checking out images and reports from tile expo’s, Pinterest trends, Instagram featured products and new launches. Work out exactly where you need the tiles and how many of each to order to make your tiling heart sing and your chosen pattern work.
Done all that? Good. Now all you need to do is get them on the wall.
Many of these super original ceramics (or porcelains) might well baffle the average tiler and left to their own devices I’ll tell you this: there ain’t a cat in hell’s chance you’ll get exactly the look you’re after.
Here’s what to do: lay them out. That’s right, lay them out. Make a space on the floor, preferably on the floor of the room being tiled or at least close by, and lay out the exact pattern you’ve designed for the wall or floor.  Above is the layout of three walls (with the middle one nearly finished) of an ensuite shower cubicle ready for the tiler to simply come in and lay them exactly how I wanted them. I didn’t want tiles of the same pattern next to each other, or too many whites in a line, or too many of the same reliefs near each other. Took me ages and I’m not kidding, the tiler still picked up the wrong ones. I spotted it though. And made him change them. He hated me.
Tip tip: Tell your tiler that you have a photo of the tiles and under no circumstances is the pattern to be changed. Strict eh 😉
Different again in feel (below) are some geo’s called Monochrome new in at Mandarin Stone and now new in on one of my client jobs. I’m not going to lie, this is the 7th play around and if the plasterer hadn’t kicked me out of the room so he could skim it, I’d probably still be sitting on the floor in the dust faffing with them. It isn’t until you actually lay tiles out and look at them that you know what looks perfect and what doesn’t. It’s so worth doing, believe me, and don’t just trust someone else to do it for you. Their taste won’t be yours.
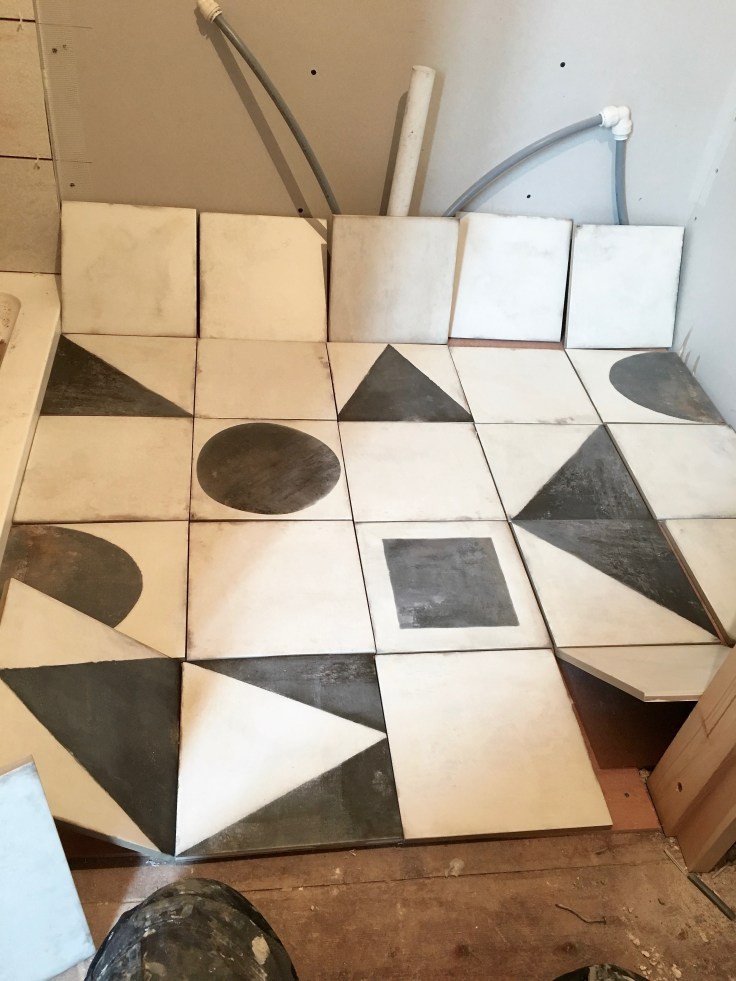 Don’t tell me, you’d have put the square one there, and the triangle there, and maybe the circle there, but hey, it’s my floor so you’ll just have buy and play with your own! Cool aren’t they?
To further complicate matters I couldn’t move these beauties from the ensuite and leave them laid out on the bedroom floor as the room is in chaos, so have taken my now advice, taken photos, printed them off on an A4 sheet and stuck it on the wall ready for tiling on Monday. No. Mistakes. Allowed.
 I did the same last year with some wonderful hexagon tiles for a client’s kitchen. On a quiet day with no-one around I laid out all the patterned hexes to see how they’d run into the room from the door and spill out into the surrounding whites. If you don’t have access to an expensive GCI plan (and most home renovators don’t), there is literally nothing as good as cold hard practice tiles on the floor.
 Because what a bit of prep work & practice make? Thumbs Up Perfect.
 Being organised will help you achieved the best result possible and will give your tilers clear direction – it’s not being strict, it’s helping them to execute your design vision 😉
Sometimes it even means drawing pretty patterns on the floor and hanging snowflakes in mid-air. They might huff & puff, but after two or so days, they’ll be in the van & gone. You have to live with those tiles for a long time, so all their huffing will be worth it. In the bottle below? That’s not water, that’s vodka, to get him through a day with me. 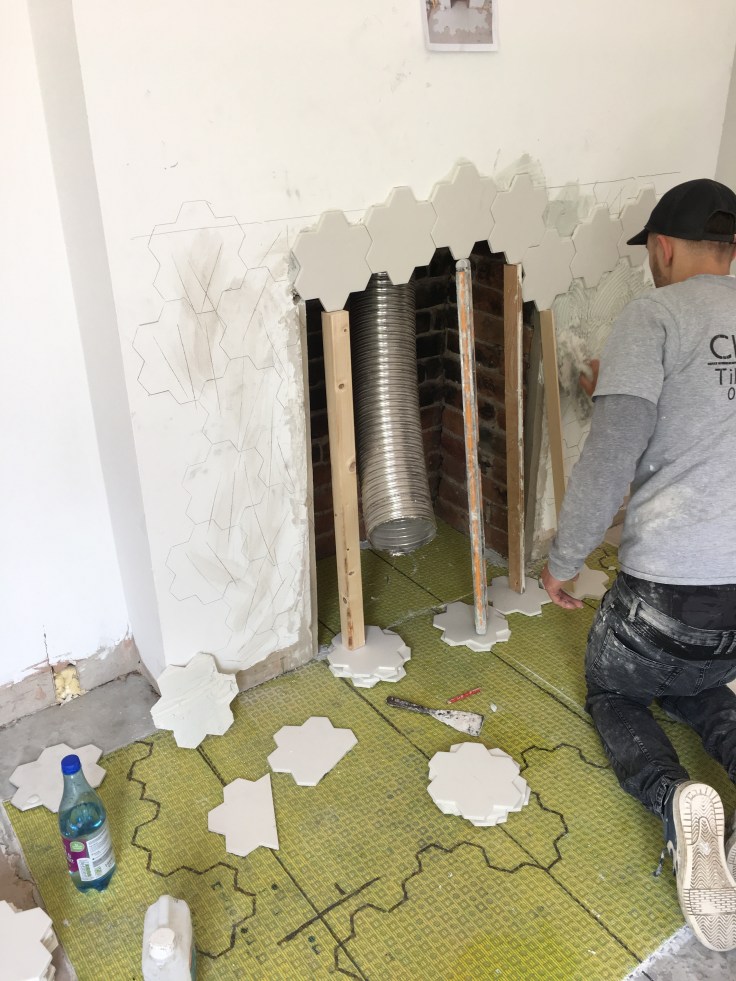 So, as you can see, all you need to do is face the tile fear and whip it into shape!
I hope those are helpful tips, and my first post for a while gives you some ideas on how to get the perfect mixed tile pattern x

Leave a comment