
 We’re really cracking on here! I’ve been banned by Mr M from leaving the house except for emergencies/showering and he’s cracking the design whip at me to finish specifying the kitchen and bathrooms. But before any type of gorgeousness happens inside, we need to install the underfloor heating (UFH) throughout as this obviously needs to go in before anything else.
Our old Edwardian house has always been freezing in winter, literally with ice on the inside of the single glazed window panes. The old boiler was supremely inefficient, but high ceilings and low insulation to walls, ceilings and floors didn’t help, with electric blankets & onesies employed in a vain attempt to keep our temperatures and spirits up. So Having the chance to future proof the main house whilst the new extension was being done couldn’t be ignored really, even though it meant a huge amount of extra work getting the timber floors level, secure and solid enough to take an flooring heating system.
Installing UFH to suspended timber floors in old houses is not straightforward, plus can be a costly do on labour if you’re not very hands on. Up until recently the main choice was either electric underfloor heating (expensive to run on large areas) or a wet-pipe based tray system, where the pipes sit on insulation between the joists, then the rising heat is spread on metal plates over which you lay chipboard (generally). The problem with this latter system is that it’s not very efficient or consistent at heating up the whole floor area and you can’t lay tiles on it as wooden joists tend to move so the grouted joints crack.
Hence, when I saw the new Robbins Fränkische Profi-Low system, I was intrigued.  The 18mm high rigid black plastic panels are 600mm x 600mm and designed to have 12mm pipe running through them, as above. They’re strong enough to drive a forklift truck over, click together and form a very strong but low profile ‘floor’. This strength is further enhanced by the addition of either:
- A poured self levelling screed to 3mm higher than the top of the black plastic, for either carpets or luxury vinyl tiles, or
- A poured self levelling screed just to the top of the black plastic, for ceramic / porcelain tiles or natural stone, or
- A 4:1 sand / cement render which they recommend is taken to the top of the black plastic, if you’re having a timber floor.
As the pipes are encased in screed/cement, the heat output performance is excellent and far better than a tray system. Plus because I want timber on the ground floor, tiles in the main bathroom and am undecided for the master bedroom, I needed flexibility alongside an optimum performance. You know me, ever demanding! This looked like just the ticket and Matt, the rep based just down the road in Chorlton was a superstar: patient, patient, and oh wait, patient, despite all our questions and some time delays. We took the plunge and decided to invest! We overlaid the re-fixed floor joists with an 18mm plywood, sealing the gaps in case we used pouring screed with its inherent runniness factor. Yes, thats’s a factor. The S Factor, for us renovators who don’t have time for telly & the other one.
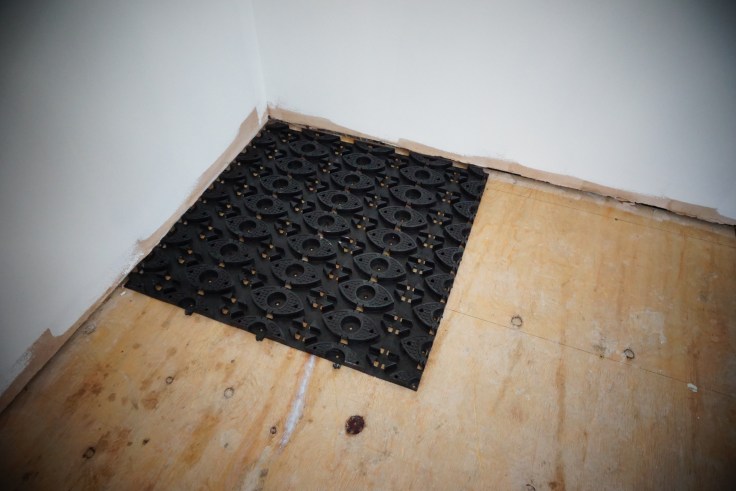 Panel No 1! I was excited by Panel No 1. I wasn’t *quite* so excited by the time we got to Panel No 50-something 😉
The panels have little hooks and eyes on the sides to lock them together and you can easily cut them down via the perforated sections in between the ‘petals’ if you need smaller sections for edging. A bit like a giant jigsaw with screws and drills. 
 It’s really quite easy to lay, if you start from a corner and screw down each tile as you do it. You don’t need to screw in every hole, each of the four corners and then a few randoms does the trick, then if you lay the pipe and lifts slightly instead of just snapping in, you add a couple more screws to make the panel more rigid.
  We had full drawings from Robbens to work to, telling us exactly where the loops should be in the panels to achieve an even heat output, plus where to run the flow and returns for each loop back to the manifold. Literally step by step instructions.
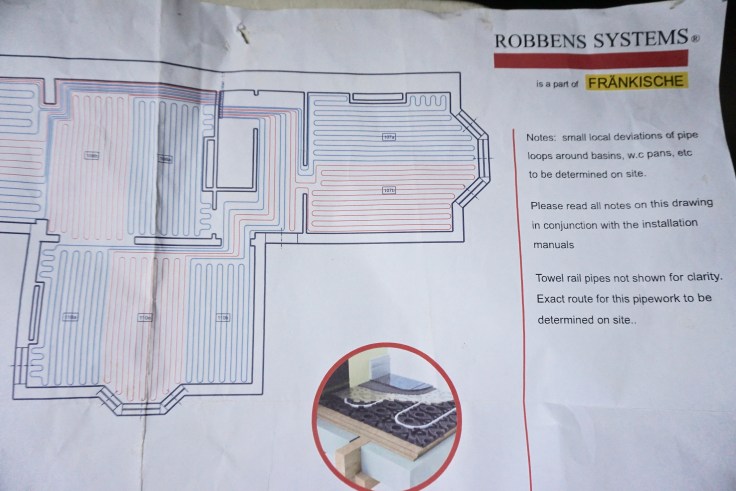
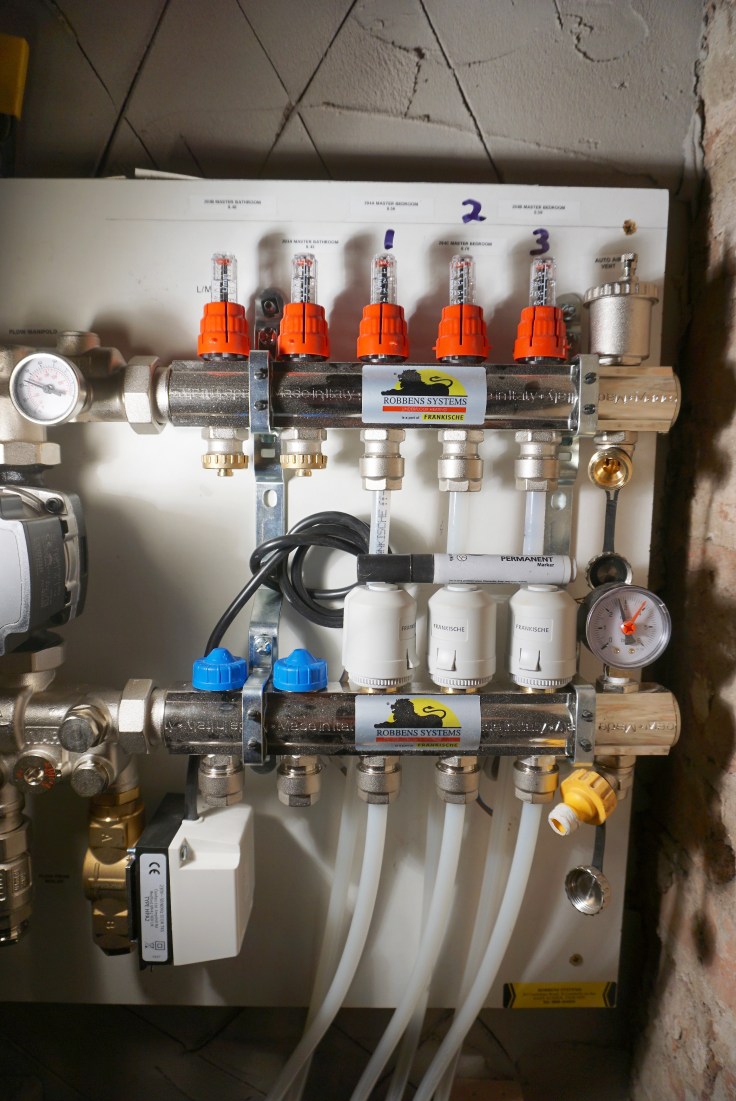
 You need to test the pipes – before sealing them in with screed or sand/cement – by either running an air pressure test or running water at a good pressure through the pipes to ensure no leaks. The pipes are super strong but this step is essential – never miss it out. The Robbens system manifolds come ready assembled, with all the diagrams and pipe lengths worked out and applicable to specified ports on the relevant manifold or manifolds, if you’ve got more than one.
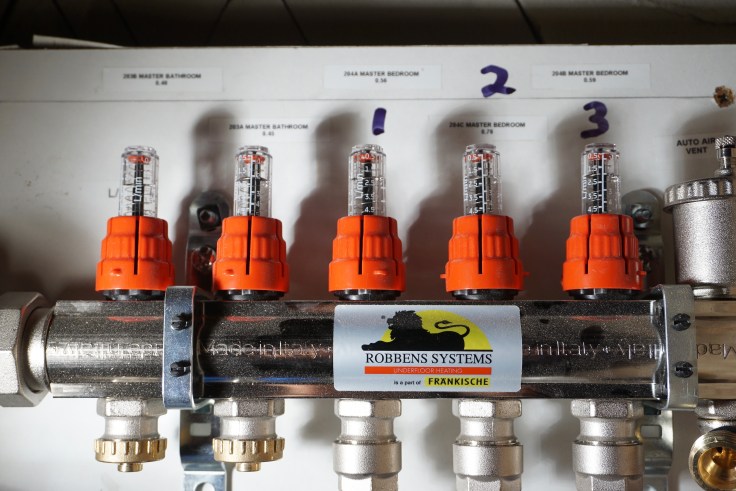
 It’s extremely straightforward, but Matt’s been on hand for any queries. Top notch, as indeed queries there inevitably are.
Most people use a pouring screed to seal around the pipes and create a solid surface and this is recommended for carpet or LVTs where a nice smooth surface is required. In actual fact in the first rooms to be done here, we ended up using the leftover 4:1 sand / cement fibre mix from the solid kitchen floor. This is far far cheaper than using a pouring screed where a 25kg bag only covers 1.1msq. Also, for us it prevented wasting the leftovers from the kitchen – good, but because of the gritty bits in it gave a bit of a rough finish – bad. You can see that in the small section I took a picture of below. I’d read that the 4:1 mix was only to be brought to the top of the plastic panels and this in places didn’t quite cover the pipes, which do sit quite high.
 I think they’d be better sitting marginally lower, even 2mm would make a difference. We’ll be using use a smooth sand / cement 4:1 mix not a sharp sand 4:1 mix on the next rooms. Resultantly we chose to cover these floor with a very thin layer of self levelling just to seal it and give a more even finish to glue our timber floor to.
  With hindsight we’d have taken the sand and cement 2-3mm higher and trowelled a smooth finish as the finished floor height isn’t critical here, then we’d have saved on self levelling. But it was very thin and only in two rooms so I’m not beating myself up about it!
We’re busy beavering away to get the panels into the bedroom and main bathroom upstairs, then in a few more weeks will do the office room. It’s great to be able to do in stages and that ability has really helped out on our self-build where things aren’t necessary done in one big hit as we’re doing so much ourselves.
Someone, however, hasn’t been impressed. Someone thinks that all those hard plastic indentations are very tough on the paws. Utter disgust from Builder Cat, prior to screening, who was aghast that we’d even considered laying such a shockingly uncomfortable floor. This is not a happy face, or bum for that matter….
 UFH is an investment, but one which combined with good insulation will transform any older property, especially one like ours with high ceilings and a cold history. We’re glad we made that investment here and I absolutely cannot wait to get the boilers in and the heating turned on!
Well worth considering for you DIY renovators and do feel free to ask me any questions x
