
Throughout my whole time working on the first 15 episodes of the ground breaking BBC2 show “Your Home Made Perfect“, I never stopped learning. Even after 24 yrs renovating properties, every day brought a situation I hadn’t come across before, a new product or material, or a new way of doing something. So for our homeowners, many of whom had quite literally never renovated before, this really was a giant leap into the unknown. Layered on top of the fact they’d be undertaking immensely ambitious projects designed by the show’s architects Laura Jane Clark and Robert Jamison.
As I eagerly await the final bunch of episodes I worked on, some of which we genuinely and actually sweated over, I thought it’d be cool to extract some lessons learned from Series 1. Eight step for you home renovators to be mindful of as you start your first reno, or undertake your next one…
1) The Spreadsheet is King (Or Queen)

Nice one Faversham! James absolutely nailed this top tip for home renovators – always Always ALWAYS create a spreadsheet for your reno.
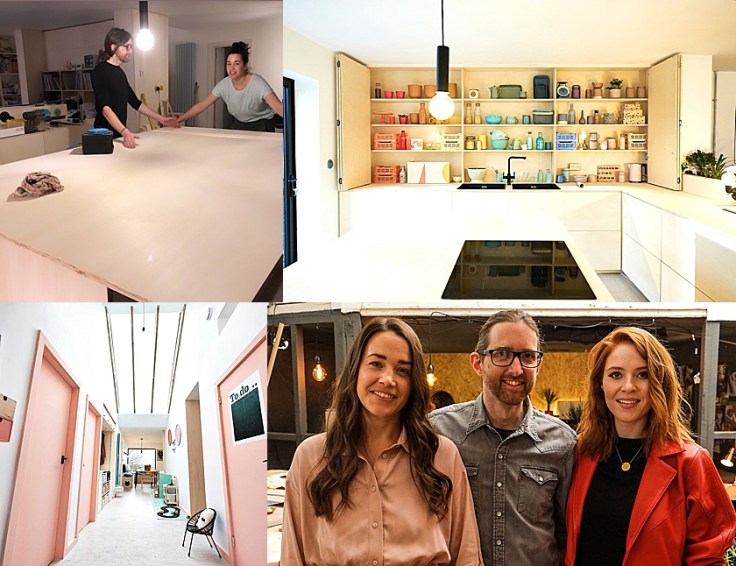
I bang on about spreadsheets on my talks at the Homebuilding and Renovating Show (postponed til later this year) primarily because they are beyond helpful as builds progress. There’s no fixed way to populate them and they’ll be different for every house or room, but having a working blueprint to input information, materials, jobs to be done, suppliers and prices means you and your builder will both be working from the same information. So yes, share it with your builder, or at least a version of it if there is sensitive financial info on there. James had his Excel version all ready waiting before I even arrived at their house – super organisational skills and ensured Laura’s design was pretty much perfect!
2) Research Research Research

Oh Helen, my lovely Helen. Now I say that because we got very close, mostly because Helen was on the phone every single day. That’s not a crit, that’s a thumbs up observation mind. With no renovation experience and hubbie Rob working away from home at the time of the filming, it fell to Helen to run the job and work with their builders. Although I was there as PM to support and assist if needed or wanted, I certainly wasn’t there every day, so how did she manage it? Research.
Helen delved into every decision, every detail and properly investigated options. She jumped in her car and drove from St Albans to the Cotswolds to investigate Laura’s suggested steel casement windows, then compared them to aluminium alternatives in South London. Comparing and contrasting, weighing up the differences. When you’re spending a lot of money, you need to get it right – seeing, touching and feeling is way better than online pictures. Word of warning : Try and do this before the build starts or at an early stage, as prevarication or umming & ahhing over decisions can drive your builder mad, slow things up and thus cost you money if done in the middle of the build.
See more of St Albans HERE, I was asked so many times about it that I wrote a blog post.
3) Choose The Right Builder

Whizzing up from St Albans to Shrewsbury now for our next top tip, which reminds me very much of Mike, Lisa, and their stealth-black garden build designed by Laura. Even though this wasn’t one of the larger renovations, it is essentially a new build on new foundations, very visible by not only the homeowners from their house, but also by all the neighbours. No pressure then eh, would you have gone for Robert’s mind-blowing Temple On The Hill? Choose the Right Builder – sounds obvious, but sometimes people really don’t take enough time to do this. It was really important to Mike & Lisa to have a good relationship with the person running their job, so they asked friends, relatives and neighbours for recommendations until they found the perfect company. They knew first hand that jobs had been completed properly, finished promptly and that good relations continued right the way to completion. They didn’t rush into just getting someone quickly but took their time & felt confident about who they were giving their hard saved money to…. that it’d be money well spent. Smart cookies!
4) Shop Around & Watch The Pennies

Sticking with the pennies and back down the country now to Wiltshire and our Westbury build, where Becky and Cris, and I hope Cris will be ok with me saying this but mostly Becky, really nailed this renovation budget-wise. Even though she was not an experienced renovator and this was an incredibly ambitious design by Robert to literally strip out a tonne of structural walls, Becky got stuck in and ‘got to know’ her build. She read through all the quotes and digested the information, asking questions about things she wasn’t sure of. This meant she knew where the builder Nick’s responsibilities lay and importantly where hers did too, i.e. exactly what she had to supply and buy. To ensure the books balanced and things didn’t go (too much) over budget, Becky then shopped around online and locally to get the very best deals possible. She was aware when and why labour costs rose, and made decisions on materials accordingly to balance the books, e.g. cutting back on bench seating and costly joinery. Whenever I spoke to Becky to assist with suppliers she was all over the cost side of works – amazing job!
5) Be A Have-A-Go Hero
Quite possibly my DIY heroine of the series lives cross-country in Eversholt, a village memorable to Mr M & I from our morning commute through the deer filled Woburn Abbey grounds. Laura’s light filled transformation of Suzanne & Danny’s bungalow was a massive challenge to this family of five who pretty much lived in the full-on build all the way through. Suzanne’s willingness to just get stuck in and have a go was completely brilliant, I loved it. It was also essential when it came to the use of bespoke plywood in their house – it would have cost them a fortune to get a joiner to do it all.
My philosophy on DIY, apart from the dangerous stuff like electrics obv, is that if you don’t have a go, you’ll never know. You might be the world’s best plywood cutter, wallpaper paster or laminate floor layer, but if you never actually have a go, you’ll always be paying someone else to do the job. There are many, many jobs which a homeowner can tackle him or herself, given a little bit of confidence and encouragement. Whether you ask you builder or trade to show you how, ask a competent friend or watch some You Tube videos, the first step is always just being prepared to have a go. You might surprise yourself 😉
6) Hold Your Nerve, Stick To The Plan
Unsurprisingly this sixth top tip is linked to one of Robert’s architectural visions on the show, visions which always push the boundaries of what even seems to be possible. It’s often the case that designs change during a renovation or a build, and this is frequently down not just to budget, but to fear. Fear from the builders to try something new, fear from the homeowners who felt brave at first but then get jittery during works when challenges arise. If you want the reality to match the virtual reality (or drawings for most of us!) then you need to hold your nerve and push through. The lovely Andy and Esther were absolutely determined to do this and it did affect the bottom of the build, but also meant that the essence of the design was not lost. Things like the datum line timber cladding, the differing floor levels, or the roll out bed under the floor all seem like small things individually, but the more small things you change, the further away from the original vision you move. If you are tempted to change things during works for ‘ease’, or if your builders suggests it to make their lives simpler, make sure you speak with your architect to establish the impact of the changes – they’re often far more important than is immediately apparent. Andy and Esther didn’t deviate from their commitment to Robert’s design, not once, despite this being a very challenging build indeed. Huge kudos also to builder Craig for his unwavering hard work up in Stirling for this build.
7) Get Some Support

Back down the M6 to Lincolnshire next, to visit Mimi and Luke in their mid-terrace in Grantham. Another Laura win, with an opening up of the ground floor and layout alteration. Things were tough here for this couple, with both working full time and full house blended family. Although Rob the builder was just super, as with many large renovations it fell to the homeowners to carry out some of the finishing DIY to keep build costs down. Supporting your partner in the differing roles required is an essential part of renovating, whether you’re the one painting late into the night or the one feeding the kids in temporary accommodation whilst your home is ripped to shreds. Mimi was the former, working hard by day as a calculator-tappin’ accountant and by night as a brush-wieldin’ decorator. The message received late at night when she was embarking on the installation of several core hole kitchen handles and rueing the number of drawers she’d designed into the kitchen still makes me smile. Recognising each other’s skills properly and respecting them, sometimes with an inequitable division of labour, can be really tricky in stressful times. Make sure you let the occasional blow-up and pressure-release pass. If you’re renovating alone, make sure you tap into a support system with friends or family, online on Instagram or other forums. Your mental wellbeing is as important as your physical wellbeing – please remember that!
8) Grow & Learn

Our last top tip is not so much of a tip as a suggestion. We’re off to Stockton up in the North East where Ruth and Lindsey live with their two beautiful girls and chose Laura’s design to banish #Buggygate from their awkward 1980’s new build. Firstly though, I must apologise to Ruth, who I pretty much spoke to every week, often more, and with whom Mr M and I worked with for weeks (see pic!) to get their home reveal ready. And I chat with her all the time on Insta, so I’ve no idea why on the Insta-Live and video below I had some kind of brain melt and called Ruth Lindsey. I blame the pressure of Live filming and the fact that I’m blonde. I have no idea what happened to my brain. Thus to be clear, kudos to RUTH and her rapidly evolving DIY skillz!! Right where was I, oh yes, growing and learning.
At the start of their build, Ruth was not a natural DIYer. Nor did she initially appear confident in her own ability to ‘do’ or learn. But what she did through the process was get involved, listen, learn and then apply. It was excellent to see and be part of. Whilst your reno is going on is the perfect opportunity to watch trades at work, see what’s involved, see how much time things take, visit site regularly if you can and keep across what’s going on. The more you watch what others do, the more their methods reveal themselves and though you may not even be a master joiner or tiler, you may well feel that a small crack repair, a ceiling re-paint or a garden overhaul may be within your capabilities. Seeing Ruth Instagram-blast around their house now, transforming bedrooms and creating a lovely garden for her family is a joy to watch!
I hope these tips have given you some food for thought. Not everyone can be super organised, not everyone can be super practical, but everyone can manage at least a handful of these suggestions on their renovation and ensure it’s propelled further along the road to success!
Sian x

Thanks for inclusion – and for watching and enjoying the show. Just ask if you need any actual details x
Hi, what was the name and where can I purchase the white 3d effect wallpaper in the Stockton episode please? Thank you.
Hi Pippa, it was from Graham & Brown! Great isn’t it. If you look on my Instagram I think it’s on there x