
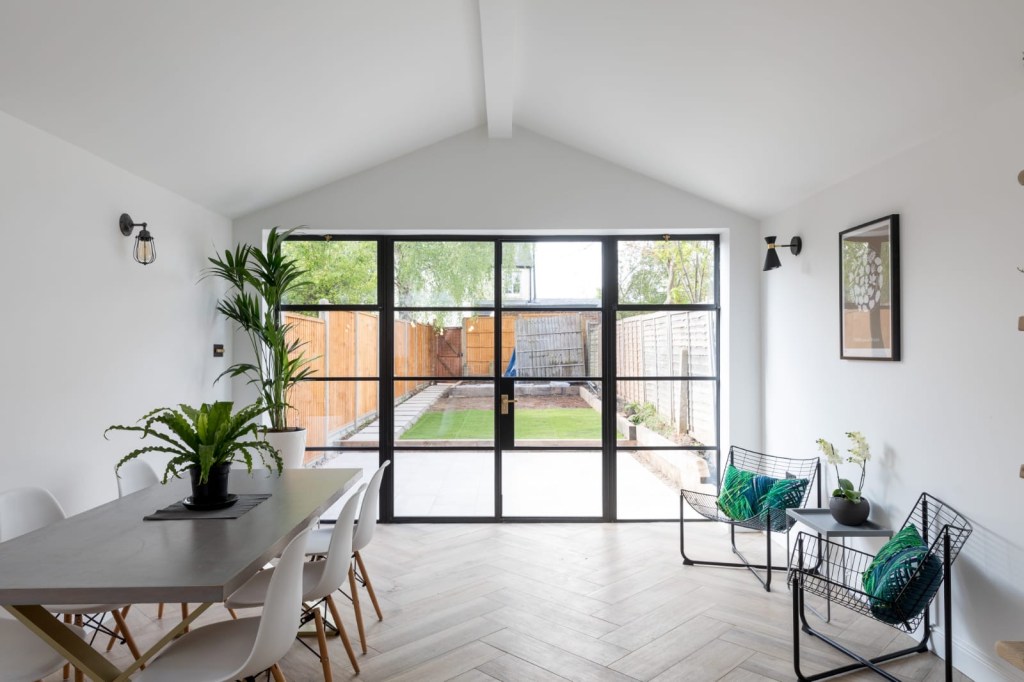
It’d be spot on to say that architect Laura Clark nailed the brief for the redesign of Helen & Rob’s Victorian terrace on the opening ep for our second batch of Your Home Made Perfect episodes. If social media is anything to go by, the Crittall love is real. Seeing these kind of inspirational projects IRL gives homeowners the confidence to really go for it and think beyond plain sheet glass bifolds, as brilliant as they are. I have bifolds. I have nothing against bifolds. But I’m imagining that a lot more of these style of doors are going to be installed over the next few years…
I’ve been asked a tonne of questions on social media about the bits which didn’t make the final show. Crikey, if the Remarkable TV team tried to get everything in it’d be a two hour show rather than an 8 to 9 slot. So, as a public service to ensure ya’ll feel fully satisfied by this particular series of house porn, here are some of the St Alban’s design details unpicked. The how’s and what’s, if you like, as well as some info on what we specified and why.
Laura’s Black Steel Framed Doors

It’s all very well and good seeing amazing designs on photos or even in VR, but for many homeowners, actually translating those dreams into reality can be a challenging process. The sad fact is that sometimes the process gets thwarted completely and incredible ideas don’t get realised. There was a point during Helen’s build, during one of our many WhatsApp chats or late night calls, that she almost gave up on them. I KNOW!!
Suffice to say there was no giving up, so, happily, Angela’s monochrome dress and bovver boots for the reveal worked like a coordinated dream.

I’ve written a full blog post to go up later this week just on these doors, if you’re genuinely interested in investing in some, or are crittall geeky enough to want to know all about the process and how & why things were picked. All that needs to be said here is that a fab company called Mike Honours Windows was chosen, with a special shout out from both myself and Helen to Sam – an absolutely delight to deal with. Helpful, clear and knows her stuff. A absolute doer. Contact her HERE.
The Herringbone Flooring

Parquet or herringbone flooring has traditionally been made of timber, which is gorgeous and tactile but isn’t the best product for both kitchens and extensions where feet are constantly in and out of the garden. Luxury vinyl tiles are super popular in contemporary spaces and work well with under floor heating, but Helen & Rob liked the idea of a solid surface. New porcelain timber effect tiles are now so darned good that who can tell the difference between them and wood anyway?? They’re textured and rippled, with superlative imagery and pattern differentials. And they don’t mark, stain or scratch like wood.
The best advice I can give you is that ups must must must get actual tile samples because they never resemble the images online and what looks one colour in a showroom will look totally different in your house. I’ll let you into a secret. 50 square metres of flooring arrived from A.N.Other supplier which unfortunately looked nothing like the in-store sample and had to be sent back. Arghhhhh. So when you do get a sample and decide on a large purchase from it, keep hold of it. Just in case.

Here’s Helen pictured above as we played with different styles and samples not only on the floor in different areas, but also against kitchen door colours and paint samples. She and Rob considered several styles over a few days ’cause when you’re spending a couple of grand on a floor – it HAS to be perfect.
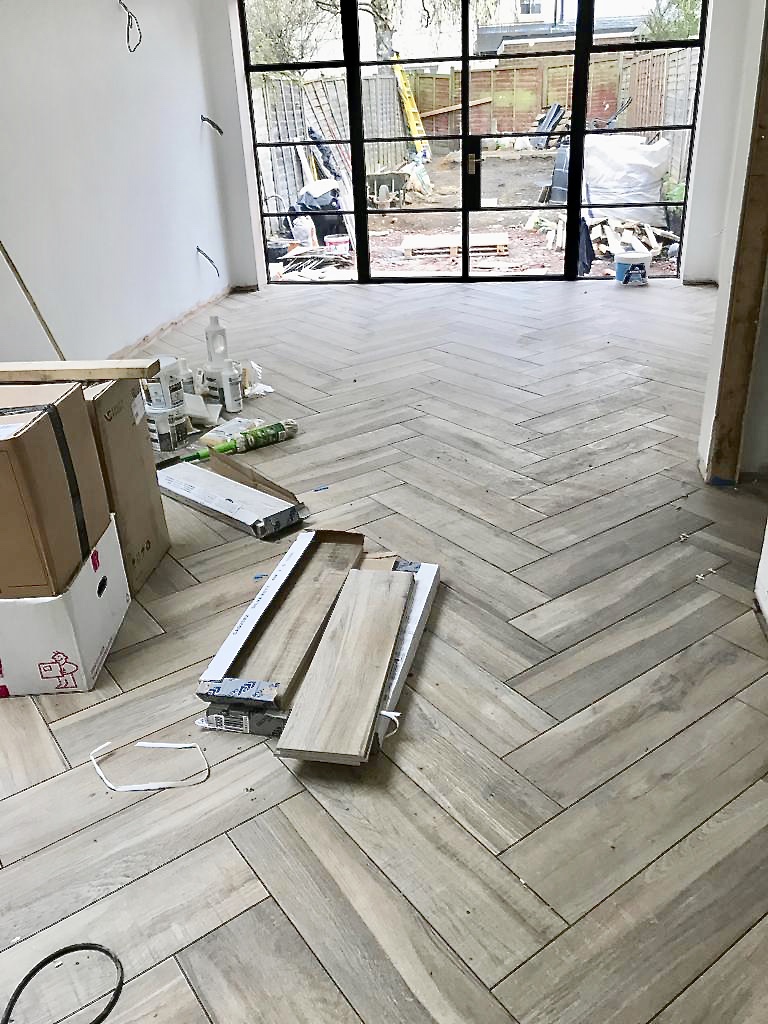
The winner was a beautiful Argento Maple Porcelain from Mandarin Stone, a company I’ve used lots of times before on projects for both myself and clients. Incredible detail, a good variation in plank pattern and great depth of texture. They work fabulously in this room with the black window detailing, adding a warm, natural element to a very bright area. The flooring looks a bit grey in the picture above, it seems a bit warmer than that IRL, see the image below.
That last sentence only serves to underline my advice above about samples, always get one as photos can be terribly misleading.
The Resin Grout

You know me, gang, super practical. The landlord in me is always thinking about how easy things are to clean and nothing is harder to clean than grout. Especially grout on a floor in a high traffic area.
When budgets are tight, every penny counts but as renovators we must also be mindful of the years ahead. Scrimping on some items is just a false economy. A really good quality resin grout is worth every penny, as Helen will attest. Shortly after her build was complete and the TV cameras had been packed away, a whole bottle of red wine was smashed on their gorgeous new floor. Unlike cementitious (powder) grout, which would have immediately soaked up the stain, epoxy grouts repel dirt and liquids. And better still the new generation, i.e. kinder to the environment two part resin grouts, are equally as resilient as the old style epoxy grouts. More expensive than cementitious and take more time to do, meaning more labour, but a quick mop and they’re like new. Not black and ganky after only a few weeks.
It made my lady builder heart sing to hear Laura and Angela specifically talk about this product on the show – spread the resin grout love I say!!
The Utility Wall
Yes – they did do it! I know it didn’t get shown, mainly I suspect because small rooms are so very hard to film and there wasn’t time to talk about everything. You can see from the stud work below how things looked on one of my visits half way through the build. With Helen looking on from her temporary kitchen 🙂

The layout on site changed a little from the VR as Rob & Helen wanted a bigger bathroom so in liaison with the builder the layout was altered and the boiler moved downstairs, directly under where it had been upstairs. The end cupboard then became Laura’s stacked washing machine / tumble dryer area, the section in the middle before the stairs became the downstairs WC and the section actually under the stairs became the cloakroom and shoe storage area.


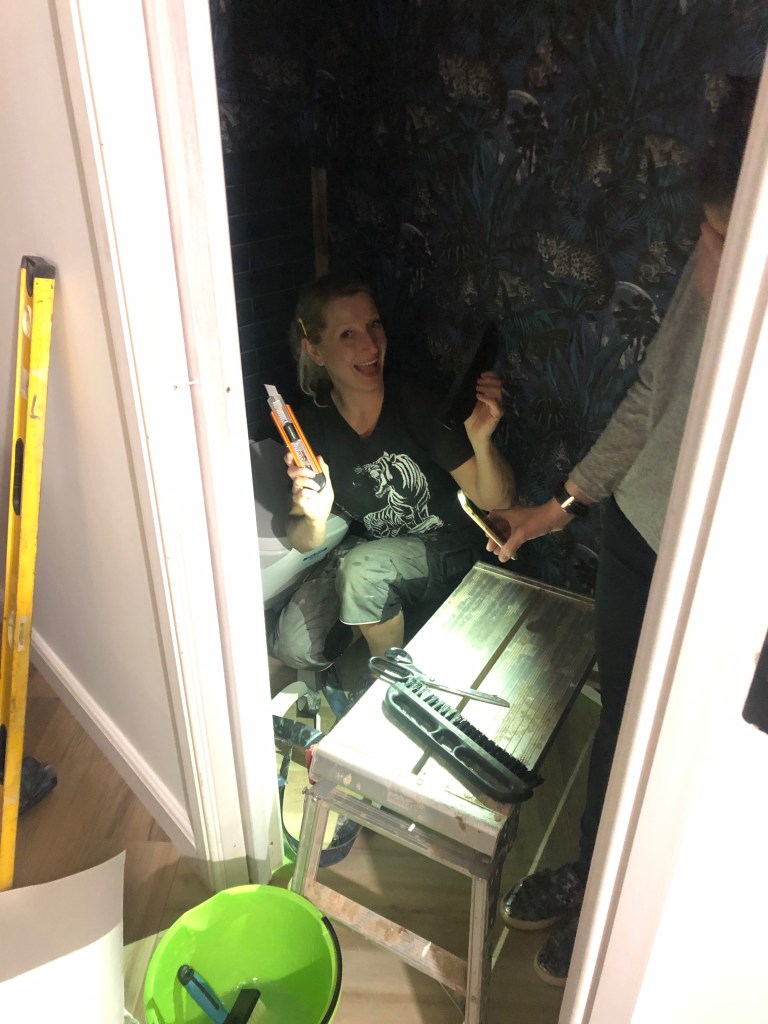
Here’s something else which didn’t make the cut – the fabulous Divine Savages wallpaper in the downstairs loo. The colour way chosen was Nocturnal Faunication – absolutely spectacular and a delight to hang. OK, maybe hanging it in the dark and getting all the leopards to march up on a full 360* four wall space was less than delightful… but we did it!
For a woman who claimed not to be very brave, Helen sure made some bossing it choices when I presented with options 😉
The Brass Splashback
Wowser eh? Who can beat a bit of glamorous brass and this splashback addition organised by Helen just elevates her kitchen space to another league. Luck can be on-side sometimes and having Quirky Interiors just down the road from the project certainly helped out. They do incredible work both commercially and residentially, and can pretty much make anything as their website shows. I love the drop down in height to the upstand pillar wraparound for extra detailing. The splashback can be lacquer protected against splashes or left to age / develop a patina over time.


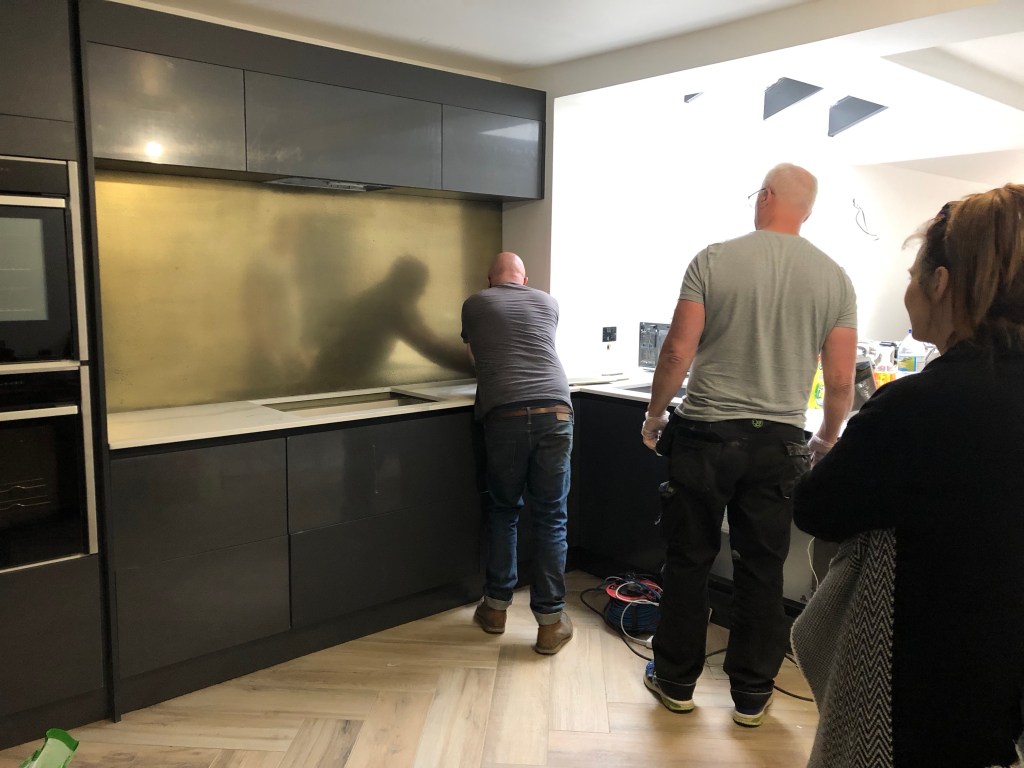
The soft beaten finish adds such delicious texture, beautiful with the marble quartz worktop and brass sink & tap combo. Lush. Absolutely lush.

The Brass Tap & Basin Combo

Renovators often forget critical details like sinks and taps. Knowing how to pull materials from elsewhere in the design to create a cohesive scheme and one which flows sounds easy doesn’t it, but it really isn’t and I see it done poorly so very often. A gold sink would have looked much to blingy in this scheme, whereas the brushed brass tap over an anthracite basin is a combo made in heaven. Both from Franke who do a brilliant range of gorgeous and affordable kitchen accessories like these. Why plump for a boring option when there is all this gorgeousness out there!
This tap is called Neptune in brass, and the sink is Kubus. Helen has commented to me about how easy the sink is to clean, for the Hinchers amongst you 😉
The Socket & Switches

God is in the detail, I say that often on my Stories on Instagram. And he (she??) really is. These delicious dimmers, designed and made by British company Dowsing & Reynolds, make turning on the lights a delight.
If you can’t afford fancy pants sockets and switches straight away, make sure your electrician installs deep rather than regular back boxes, then fit temporary white plastic fronts. This way you can save up and buy gorgeous ones later. That’s what I’m doing here at Moregeous HQ, room by room. Please give your plastic ones to another renovator, don’t just throw them away.
The Birch Tree Lighting
Never for one minute when redesigning and refitting The Flower Lounge did I imagine that the unwanted pieces of silver birch we took away from site, and then piled up in a corner of the Moregeous garden, would end up in Mr M’s car coming down the motorway to St Albans!!
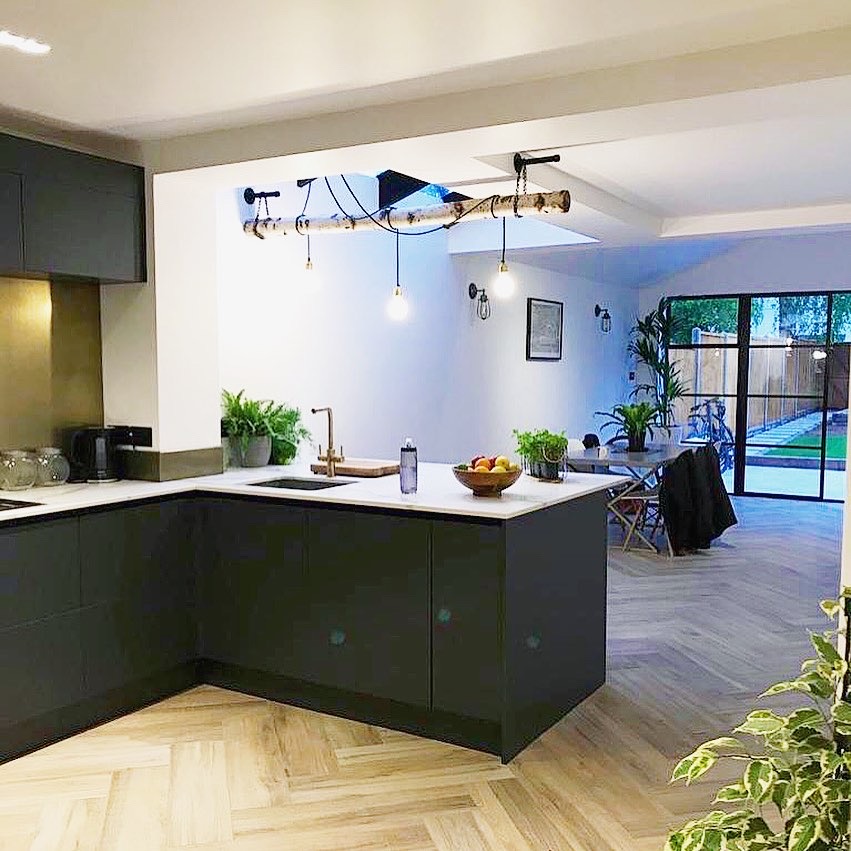
Boy, was this lighting a bit of a headache. Steels in the way, rafter line glazing above, a work surface positioned below so any drop lighting coming down from the plasterboard would hit Rob on the bonce whilst he was washing up…. honestly, talk about things sent to try my ladybuilder brain.
You can just see the first fix feed wire behind my head below. One cable poking out of the wall in probably the only place it could. Yes, there could have been all sorts of fancy LEDs but fancy LEDs cost a lorra cash. So I had to be inventive! We fixed metal flanges and posts to the wall, hanging the birch tree trunk off them using looped black chain from B&Q. Heads up again to Dowsing & Reynolds for the delicious emerald green cable, sexy brass components and drop dead gorgeous diamond faceted light bulbs which allowed me to create something unique to light up this space.

If you have problem areas at your reno, then sometimes just thinking about it for a few hours, or days, or even weeks can help you find a solution. You’ll suddenly see something and think AHHHHH I know where I can use that. Honestly, trust me, it happens!
The Quartz ‘Marble’ Worktop
Sorry for the darkish shot below, but you saw the show and you get the drift. Marble effect quartz gives the stunning look of marble without all the downsides like porosity, tendency to stain and water mark, and even scratch easily. This was ALL Helen, this worktop. She researched, sourced, deliberated and got samples. So proud of her! This agonising over finishes can drive builders potty but you’re only going to do this once, so making the right decision on expensive items is so very important.
Try and make decisions like this early on so as not to hold up the build process and cause time delays, and therefore increased costs.

The Scaffold Bookshelves
These are totally getting built in my garage workshop in summer 2020 following Mr M and I cutting our teeth on them in St Albans. Bespoke, a perfect fit for the corner and pretty well executed I’d say 😉
More deets on a full blog post HERE

The Industrial Bathroom & Monochrome Tiles

Everything flowed from Laura’s design for the window. Although cost implications meant that the protruding oriel style window couldn’t be done, the sense of drama created by increasing the window opening size meant that the internal scheme had to be equally wow. Keeping the finishes simple and effective with black taps & detailing reflects the crittall style of the window and the choice of the Bathstore suite was bloody luckily timed given they sadly went into receivership shortly after purchase.

The actual layout – I know, I need to learn CAD or Sketch Up – worked for all parties. Rob got his Viking sized shower, Helen with her luxury free standing bath and Robyn won big style as she no longer had to see her dad run naked through the house from the downstairs shower room 😉
The boxing off in the corner is for pipework to future proof the house for a possible loft conversion and to take the downstairs WC soil vent outside. This boxing off grew in size with all the pipes but still didn’t impact too much as it was at the end of the bath. The central heating run towel rad is partly ‘in’ the shower which freaked the fitter out but as the towel rad is black, rusting isn’t as major issue as it would be with chrome. A quick wipe down of splashes after summer showering and a regular clean is fine. In winter when on, the water splashes dry themselves.
Note also we designed the shower controls on the side wall so it’s easy to switch on & adjust the shower without getting soaked wet – a bane of my travelling life in hotels whose bathroom designers never seem to think of such things.
There’s space round everything to move freely and it feels wonderfully spacious. So now to the tiles…..
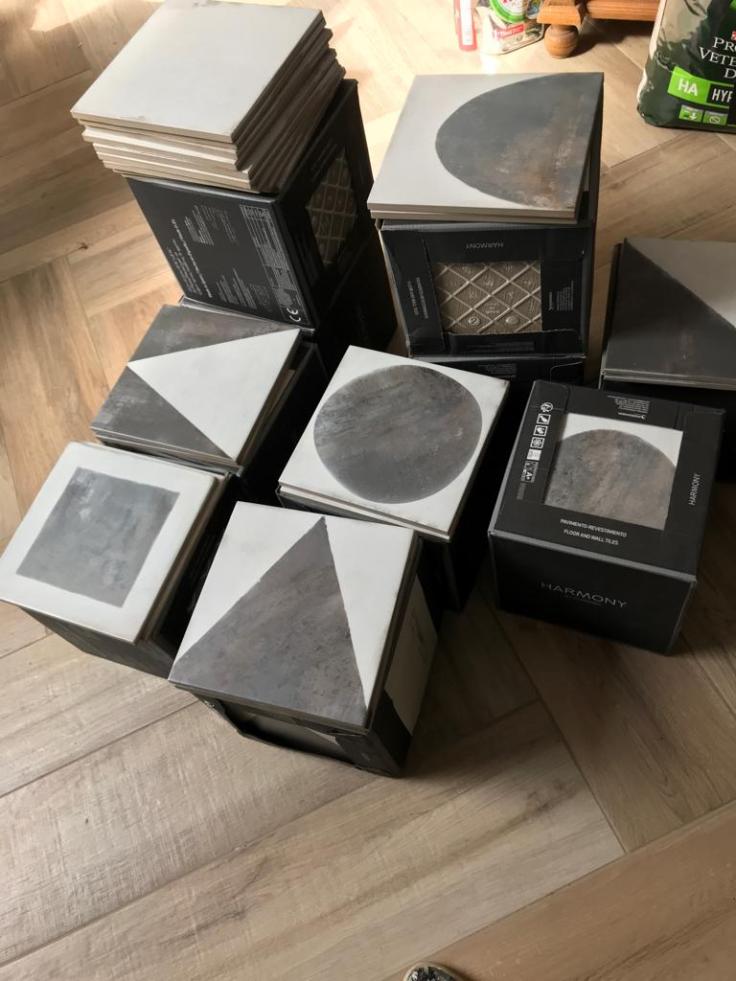

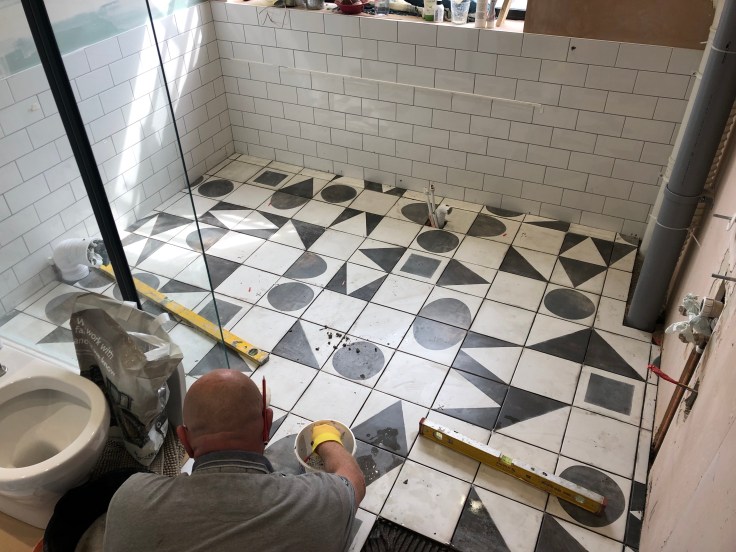
Aren’t they just stonkin?? Bold, uncompromising, fully able to compete with the strength of the window and utterly funky to boot. If you choose these tiles you need to be on site with the tiler when they’re being laid – no two ways about it. Decide on your pattern beforehand if you’re a design nut, and lay them out in the room, taking a photo and printing it off so you and the tiler can follow it when all the tiles are piled up again. Otherwise, be there and direct operations!
You can use more plains than patterns, 50/50 or more patterns than plains, as we did here. Mix them in with metros or vertical skinnies, with marble, with colour. They are so very versatile. I love that tiles have got so brave and homeowners have got brave too!! When I suggested running them up the wall in a panel behind the sink, eyebrows raised but it was in for a penny, in for a pound at that point eh Helen?


Find these stunners at Mandarin Stone HERE, but tonnes of other companies also do incredible geometrics now, so do lots of research and get samples to help you decide.
The ‘Puck’ Paint
Having some fabulous #inspo images are a good way for renovators to not only make hard decisions, but also keep on track with the design. The image on the left below is from Bathstore, where the suite was purchased, and the one on the right is one we considered in relation to tile layouts.

The images definitely helped give Helen & Rob confidence in such a bold colour choice – made it a bit of a no brainer actually as dark hues look so damn good. After considering some colour cards, Puck by Little Greene was the clear winner. Oh, what a joy that was to cut into a curved ceiling….

The Cool Shower & Tray
The shower was particularly important to Rob, at 6’5″ and after years of showering in the terrible bathroom downstairs. It’s a big decision to lose a bedroom, but one homeowners are increasingly making if it works for them & their house. There’s no need to always be petrified of an end value impact. With just two bedrooms actually needed, converting the rear third one into a luxury bathroom made perfect sense for this family, and to my mind, would do for plenty of future buyers too.

I specified the biggest tray we could for the space at 1400 x 1000 and wanted something with clean lines, a white drain (as chrome would not work with the black and brass fittings) and a minimal step-up. Here at Moregeous HQ we’ve used Kaldewei shower trays in both the main bathroom and two ensuites so for me it was a no brainer in terms of flexibility on size, gorgeous detailing and cool styling. The builder was concerned about the lack of door at one end and the fall on the tray. And about stopping the screen just short of the end of the tray. And about positioning the towel rail here, though there was nowhere else for it to go without changing the whole bathroom design. Delighted to report that even with Rob splashing around in there, the shower area works a treat. These trays are designed to look minimal but prevent any water run off.


All that remains for me to say is that it was a delight to work with Helen, Rob, Robyn and Minty the dog on this St Albans project. There was laughter as well as blood! We had such fun there as well as working hard, and the best fish & chips we’d ever had. Godfreys, I think it was called, thank you Helen for that brilliant site lunch.

I really hope the above is useful if you saw this smashing episode and wondered about some of the details. Might have to write up a couple of the other episodes now!
It’s been an incredibly busy year working on this series of Your Home Made Perfect, I’ve had so many messages from you about the episodes so far and there are still lots of crackers to come. In this short run there’s one more tomorrow, in Shrewsbury, and then more earlyish next year. Some well deserved time out for me and Mr M now though – I need to finish Moregeous HQ and write my book! Now there’s a teaser eh 😉
